You bought an espresso machine, and now you are staring at a counter covered in small metal objects wondering which ones you actually need. That is exactly where the confusion starts. Photos of beautiful espresso stations imply that a drawer full of gadgets is normal. The people who make coffee every morning without friction are working from a much shorter list.
The honest answer is that a good espresso setup is not defined by how many accessories sit next to the machine. It is defined by how cleanly the process flows from bean to rinsed cup. Every tool in this guide exists because a specific step in that flow creates a specific problem. Understand the steps first, and the shopping list sorts itself out.
This guide walks the real espresso workflow step by step, and places each tool in one of four tiers: Essential, Highly Useful, Optional, and Skip at First. For a comprehensive verdict on what actually changes extraction versus what is merely marketing, see our companion guide on Coffee Gadgets That Are Actually Useful: What to Buy and What to Skip, including how to tell a useful gadget from a gimmick.
Every product referenced below comes from our full Home Coffee Bar Setup collection, where the complete specs, prices and regional picks are documented. Here, each tool appears only where it belongs in the workflow, with its core data and a direct link to that section.
The Espresso Workflow at Each Stage
| Stage | Tool | Tier | Why it exists |
|---|---|---|---|
| Dose and transfer | Dosing funnel | Highly Useful | Contains the grounds that otherwise spill across the counter |
| Distribute | WDT tool | Optional | Breaks up clumps and evens out the coffee bed |
| Tamp | Espresso tamper | Essential | Compresses the bed into a flat, level puck |
| Brew and measure | Coffee scale | Essential | Measures both the dose in and the yield out |
| Steam milk | Milk pitcher | Optional → essential for milk drinks | Only needed if you texture milk |
| Knock and clean | Knock box | Highly Useful | Keeps spent pucks contained beside the machine |
The espresso machine and the grinder are deliberately absent from this table. They are not accessories; they are the infrastructure the rest of the setup is built around, and choosing them is a different decision from choosing the tools that surround them.
Start With the Espresso Workflow, Not the Accessories
A barista's routine follows a fixed physical sequence. Understanding it is what separates a station that works from a pile of gadgets that merely looks like one.
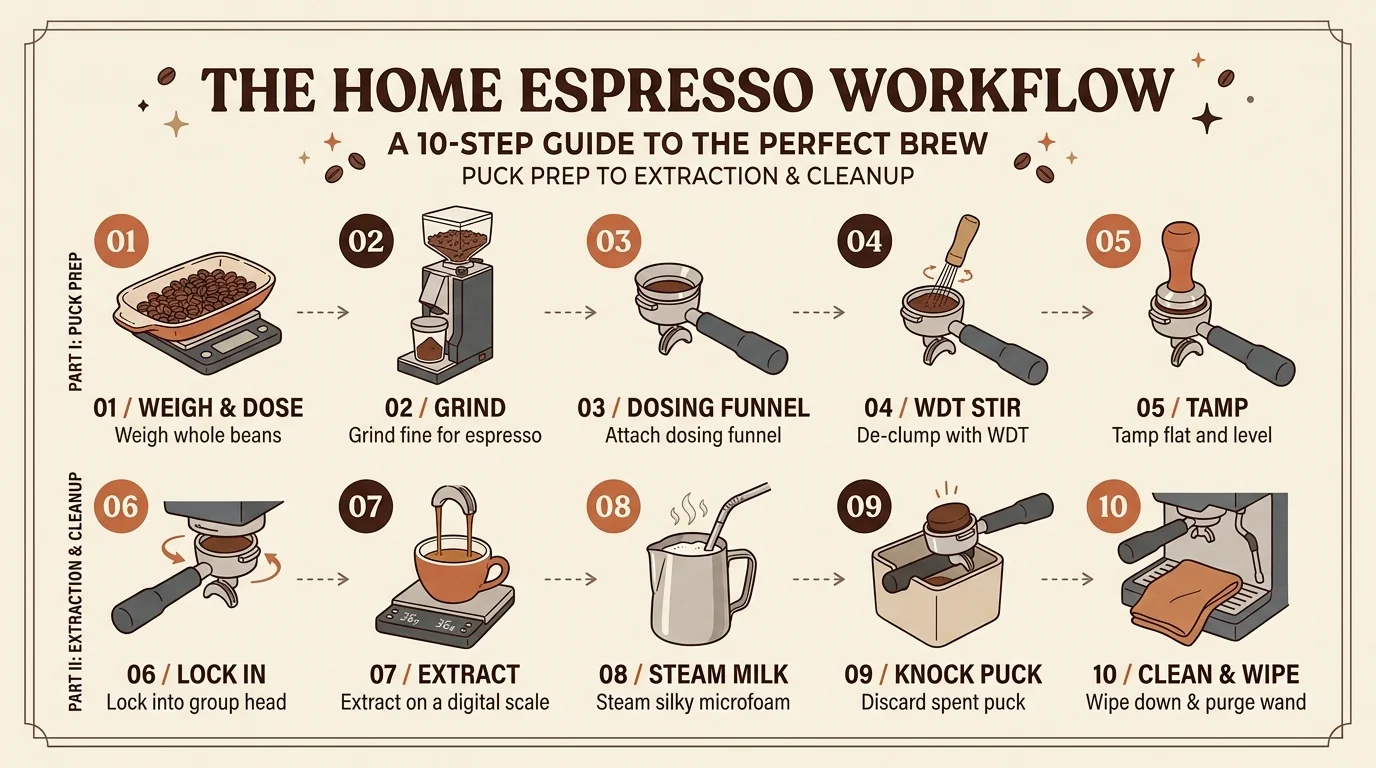
Every product recommendation in this article maps to one link in that chain. If a tool does not shorten, clean up, or stabilise a step, it does not belong on the counter.
1. Grind
The first decision is not which accessories to buy, but whether your grinder can actually grind for espresso. Espresso demands a much finer and more adjustable grind than filter coffee. A grinder that cannot make small enough adjustments will leave you stuck between a shot that gushes and a shot that chokes.
Place the grinder directly beside the machine. It sounds trivial, but it removes the two most common sources of daily friction: carrying a loaded portafilter across the counter and spilling grounds on the way. A station organised around a short grinder-to-machine distance is faster, cleaner and calmer at 6:30 in the morning.
The machine is the centre of the station, not its decoration. It needs power, and depending on the model, enough clearance to remove and refill the water reservoir. Everything else arranges itself around it.
A note on scope: the machine and grinder are treated here as infrastructure. This guide does not recommend specific models, because that is a separate purchase decision with its own research, and our collection article handles the accessories around them rather than the machines themselves.
2. Dose and Transfer the Coffee
After grinding, the coffee has to get from the grinder into the basket. This is where the first genuinely useful accessory appears: the dosing funnel.
- The problem it solves: grinding straight into an open portafilter produces a fluffy, static-charged mound that spills over the rim. The grounds scatter across the counter and you lose part of the dose every single time.
- What it actually does: it acts as a temporary extension of the basket wall, so you can grind, stir and settle the portafilter without anything escaping over the sides.
- The honest framing: a dosing funnel does not make better espresso. It makes the workflow cleaner and calmer, which is exactly why it earns its place early as an essential tool for intercepting mess at the source.
What the collection recommends here
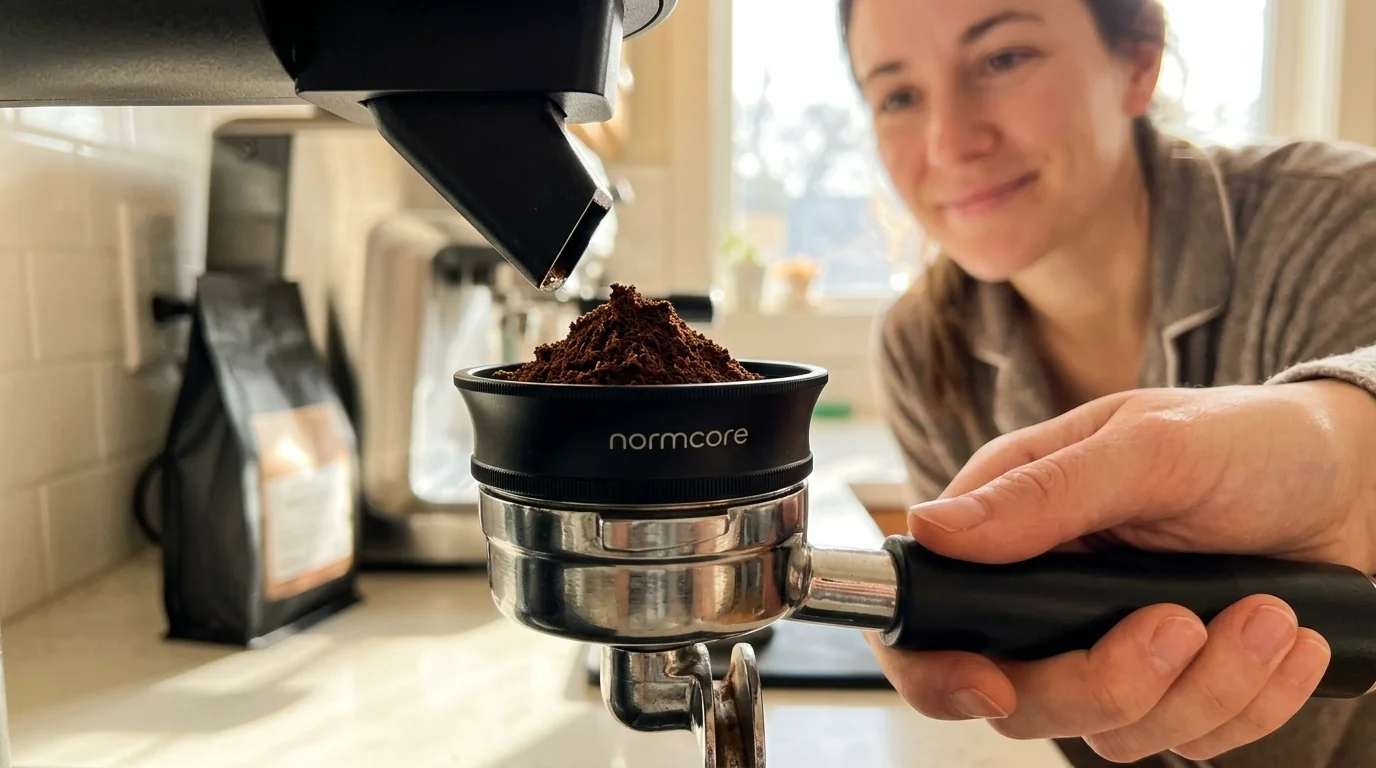
The Normcore 54mm magnetic dosing funnel is the collection's pick for this step. Its core data: an 18mm anodised aluminium collar held by eight neodymium magnets, a twist-to-lock fit sized for 54mm Breville-style portafilters, and a dishwasher-safe finish. The collection lists it at approx. $19.19 in the US, with the Sage OEM funnel at approx. £14.95 in the UK and a 51mm Ailelan magnetic ring at approx. €7.64 in Germany.
Before you buy: check your basket diameter first. Portafilters come in 51mm, 54mm and 58mm, and a funnel sized for one will not fit another.
See the full dosing funnel breakdown in the collection →
3. Distribute the Grounds
Before tamping, many baristas stir the grounds to even them out. This is puck preparation, and it is where the WDT tool lives.
- The problem it solves: grinders produce clumps, and clumps create uneven density inside the puck. Water always takes the path of least resistance, so an uneven bed invites channeling: the water drills through one weak point instead of flowing through the whole puck.
- What a WDT tool does: fine needles (typically 0.3–0.4mm) are stirred through the grounds to break the clumps apart and redistribute them into a more even bed.
- The honest framing: WDT is a genuinely useful tool, but it is not the first thing a beginner should obsess over. If you are still learning dose, grind setting and a level tamp, adding needle distribution just introduces another variable. As detailed in our accessory review, a WDT tool pays off only when distribution is your actual bottleneck.
What the collection recommends here
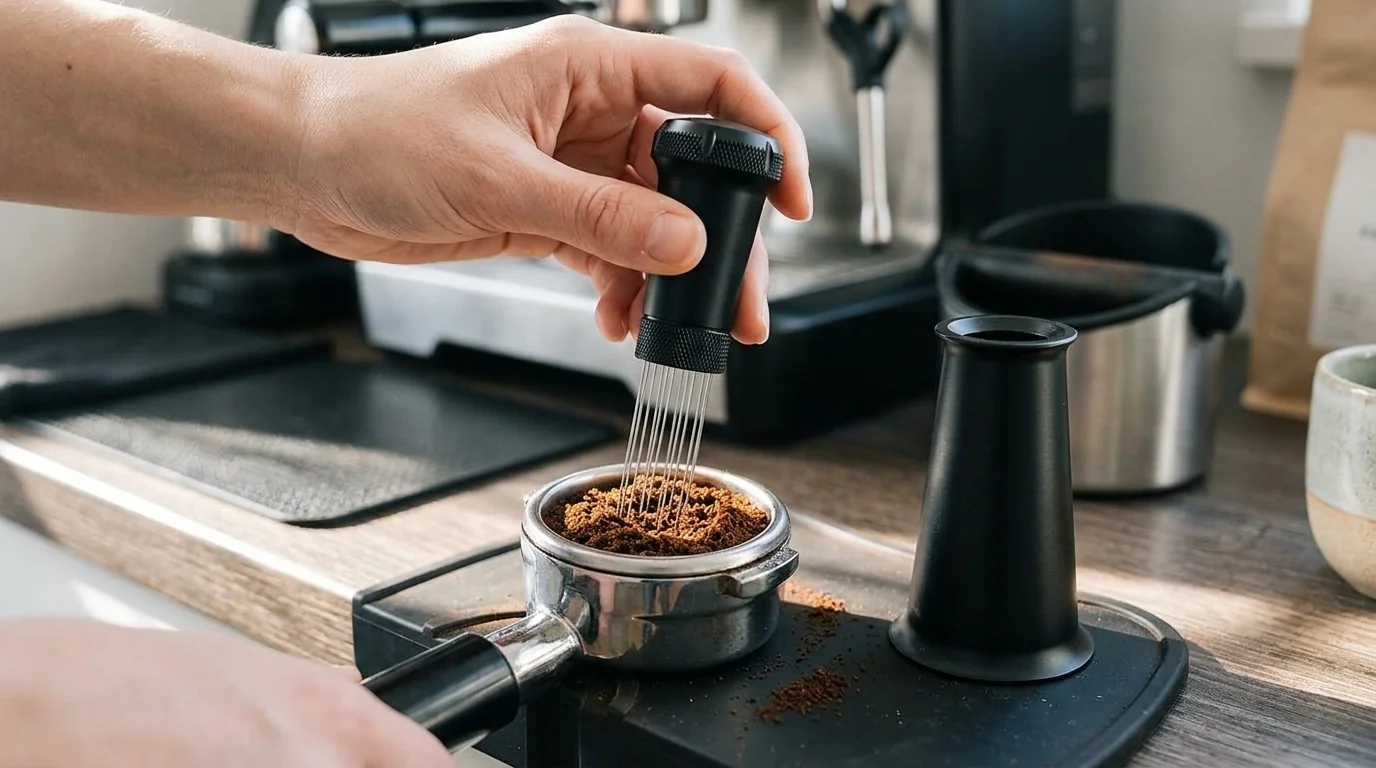
The Nessus WDT distribution tool is the collection's pick for this step. Its core data: ten food-grade stainless steel 0.35mm needles, a configurable needle head that can run five to nine needles, a built-in cleaning brush in the stand, and an aluminium handle. The collection lists it at approx. $11.99 in the US, with the MEION 7-needle version at approx. €12.58 in Germany and a retractable-needle Subminimal tool at approx. €22.76 in Italy.
Before you buy: if you use a pressurised (dual-wall) basket or pre-ground coffee, a WDT tool adds nothing. It does its best work with non-pressurised baskets and freshly ground coffee.
See the full WDT breakdown in the collection →
4. Tamp
Tamping compresses the prepared grounds into a compact, level puck so water meets even resistance across the bed.
- What good tamping looks like: the goal is not brute force, but a flat, evenly compressed bed. A tilted tamp creates a sloped bed, and a sloped bed extracts unevenly no matter how good your grinder is.
- Fit matters more than luxury: the tamper base must match your basket diameter. As our gadget verdict highlights, tamper fit matters far more than price—a 58mm tamper in a 54mm basket leaves a ring of untamped coffee around the edge.
- The upgrade rule: if your machine already includes a tamper that fits correctly and produces a level puck, you do not need to replace it immediately. A heavier or more expensive tamper is a comfort upgrade, not a requirement.
What the collection recommends here
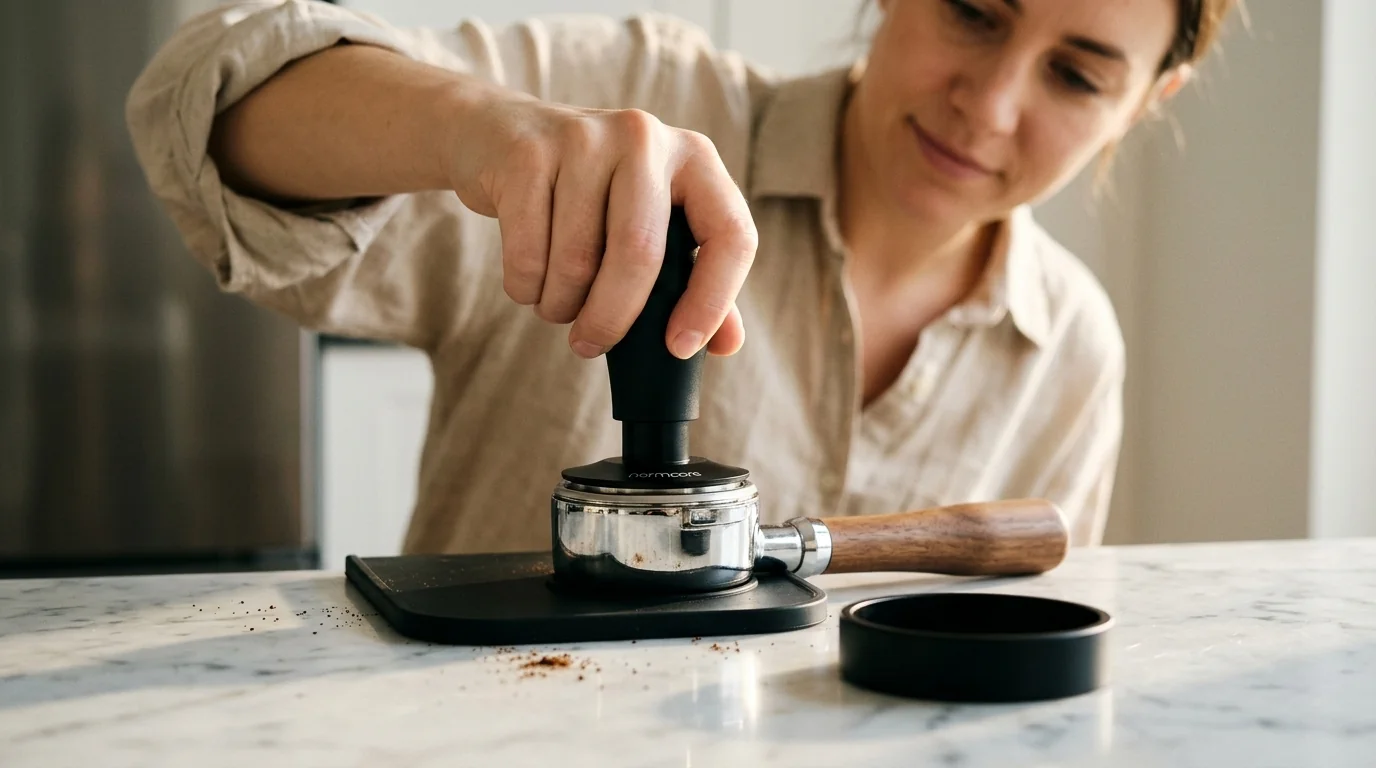
The Normcore V4 spring-loaded tamper is the collection's pick for this step. Its core data: interchangeable calibrated 15 lb, 25 lb and 30 lb springs that click at a known force, a flat base for level compression, an anodised aluminium handle, and a matching stand. The collection lists it at approx. $33.60 for the 53.3mm version in the US, with a solid 51mm stainless tamper at approx. €9.34 in Germany and approx. €9.99 in Spain.
Before you buy: the collection's own caveat is worth repeating. A premium tamper is not necessary if the included one already seats correctly. Measure your basket first, because a 51mm tamper will not seat in a 54mm Breville-style basket.
See the full tamper breakdown in the collection →
5. Brew and Measure the Shot
This is the single most important accessory decision in the whole setup, because it is the one that turns espresso from a gamble into something you can actually control.
Why a Coffee Scale Matters
A scale solves two separate problems at once:
- The dose in: how much coffee actually went into the basket?
- The yield out: how much liquid espresso came out, and in how long?
Without a scale, when a shot tastes wrong you cannot tell whether the problem is the grind, the dose, or the yield. You end up changing variables blindly. With a scale, a shot becomes a set of numbers you adjust one at a time: an 18g dose producing a 36g yield in around 25–30 seconds, for example. That repeatability is the entire foundation of dialing in. That is why a 0.1g coffee scale is the cheapest upgrade that changes everything in any espresso setup.
A scale also measures extraction in real time. Placed under the cup, it lets you watch the yield climb and stop the shot at the right weight, rather than guessing at a volume that changes with crema and bean density.
What the collection recommends here
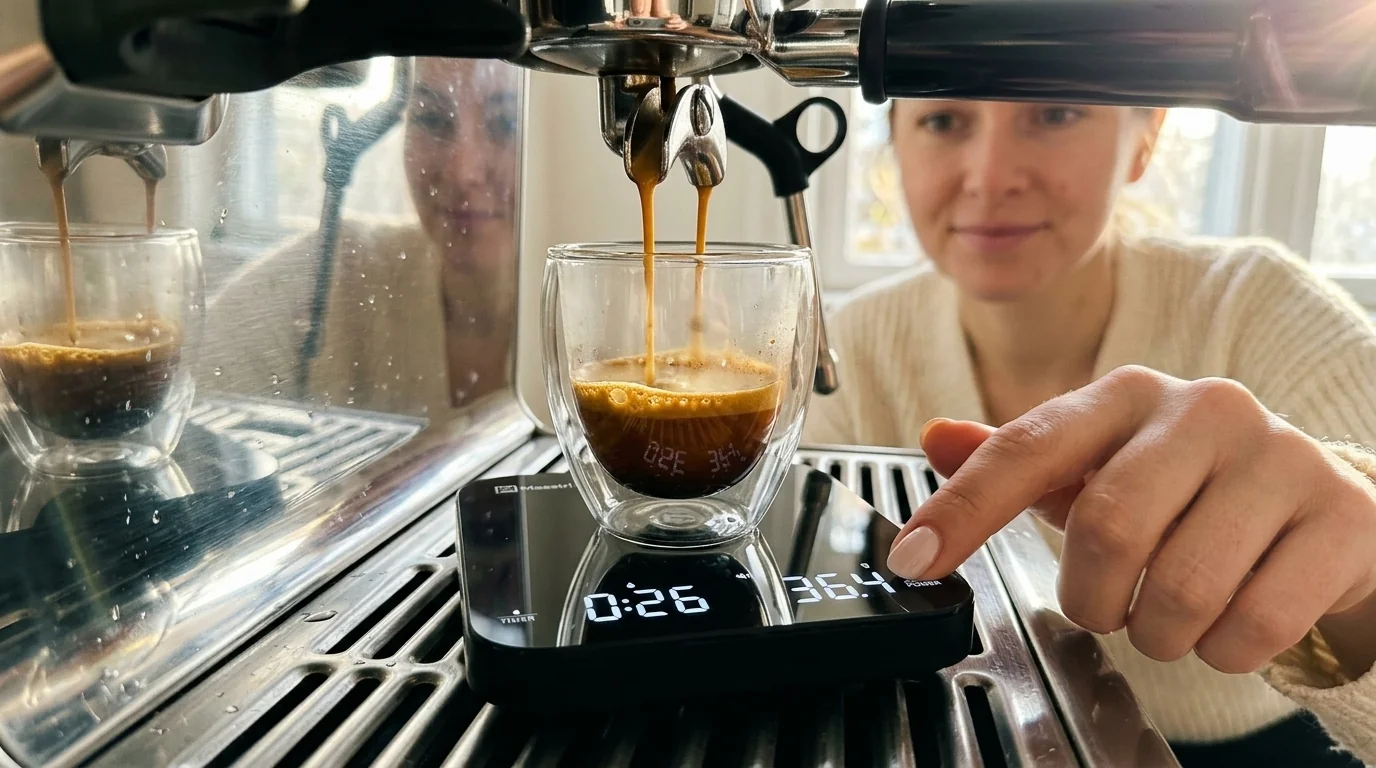
The Maestri House S2 espresso coffee scale is the collection's pick for this step. Its core data: a 4.13 × 4.13 × 0.78-inch, 0.75 lb body that reads from 0.5g to 2000g in 0.1g increments, automatic and manual timer modes, three switchable units (g/oz/ml), and a 500 mAh USB-C battery rated for roughly 90 days per charge with automatic sleep after five minutes. The collection lists it at approx. $25.59 in the US, approx. £25.30 in the UK and approx. €25.49 in Germany.
Before you buy: measure the clearance between your portafilter spouts and the drip tray. Your tallest cup plus the height of the scale has to fit under the group head.
See the full scale breakdown in the collection →
6. Steam Milk — Only If You Drink Milk-Based Espresso
Whether you need a milk pitcher depends entirely on what is in your cup.
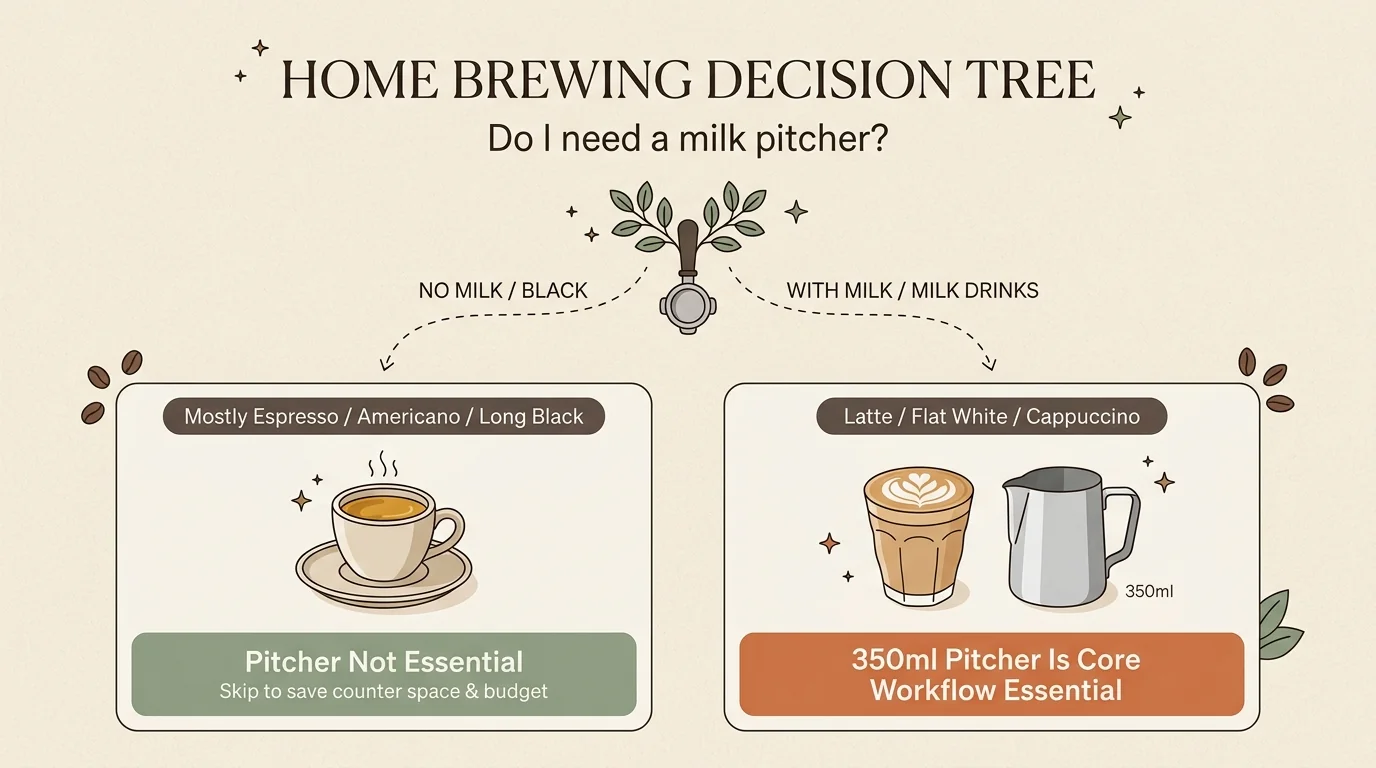
- Why capacity matters: domestic steam wands are less powerful than commercial ones. A large 600ml or 950ml pitcher forces you to pour far more milk than a single drink needs just to submerge the steam tip, and the rest is wasted. A 350ml pitcher gives the right depth-to-volume ratio to texture one serving into glossy microfoam.
- The honest framing: this is not a tool every setup needs. If you never steam milk, skip it entirely.
What the collection recommends here
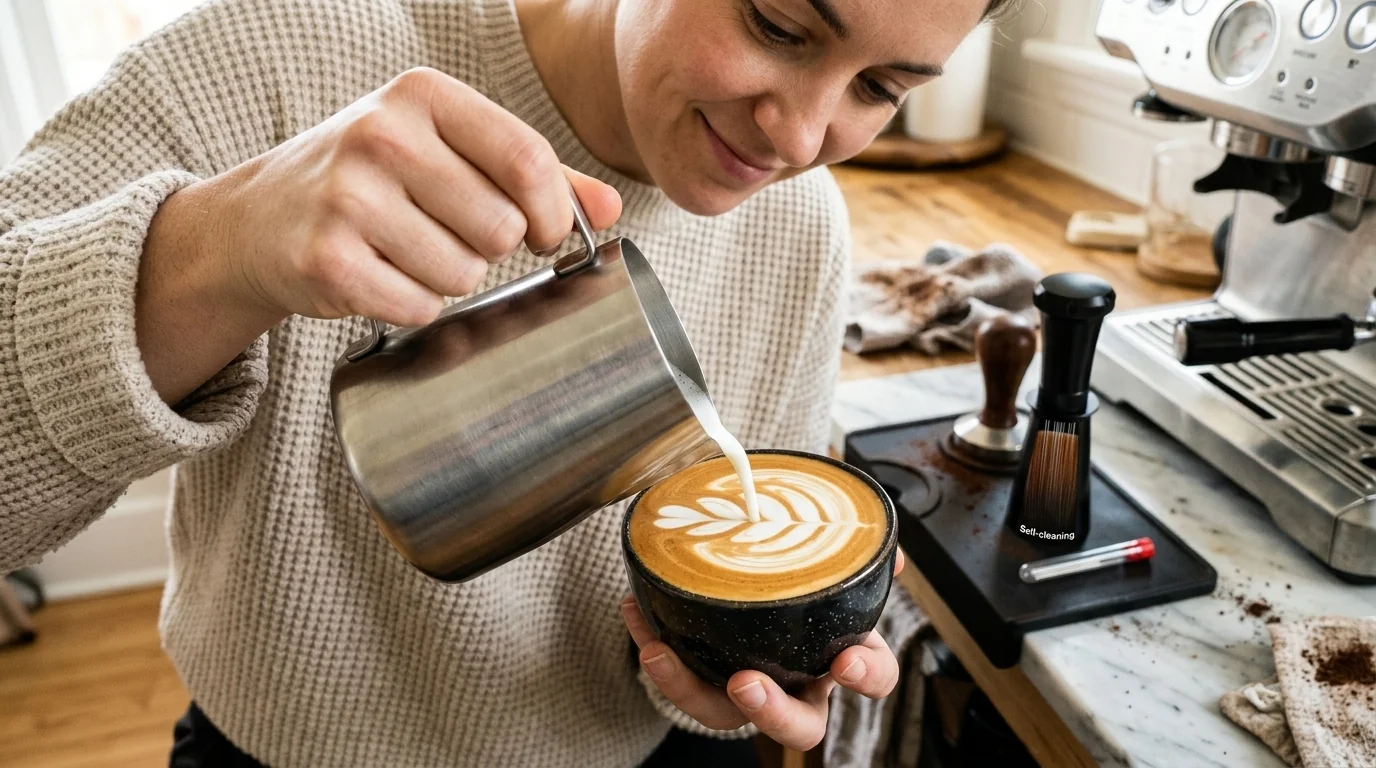
The Adorever stainless steel milk frothing pitcher is the collection's pick for this step. Its core data: food-grade 304 stainless steel, a pointed eagle-beak spout that concentrates the pour into a fine stream, internal oz/ml measurement markings, and an ergonomic wide handle, all dishwasher safe. The collection lists the 12oz version at approx. $8.49 in the US, with a 350ml PLACHIDAY pitcher at approx. £6.13 in the UK and a 350ml BASECENT pitcher at approx. €6.98 in Germany.
Before you buy: if you regularly texture milk for two large drinks at once, step up to a 600ml pitcher. For single drinks, 350ml keeps the counter clearer and gives better steam-wand depth.
See the full milk pitcher breakdown in the collection →
7. Knock and Clean Up
The last step of every shot is disposing of the spent puck, and this is where the knock box earns its place.
- The problem it solves: spent pucks are wet, hot and compact. Banging a heavy portafilter against a plastic kitchen bin can crack the bin, dent the portafilter ears, or drop the basket into the trash.
- What it actually does: a knock box gives you a rubberised strike bar that absorbs the impact and keeps wet grounds contained in one spot, immediately beside the machine.
- The honest framing: a knock box is about workflow and cleanliness, not extraction quality. It will not make your espresso better. In our gadget hierarchy, a knock box is strictly for convenience and cleanup—it makes your kitchen more pleasant to use, but sits below the scale and tamper in priority.
What the collection recommends here
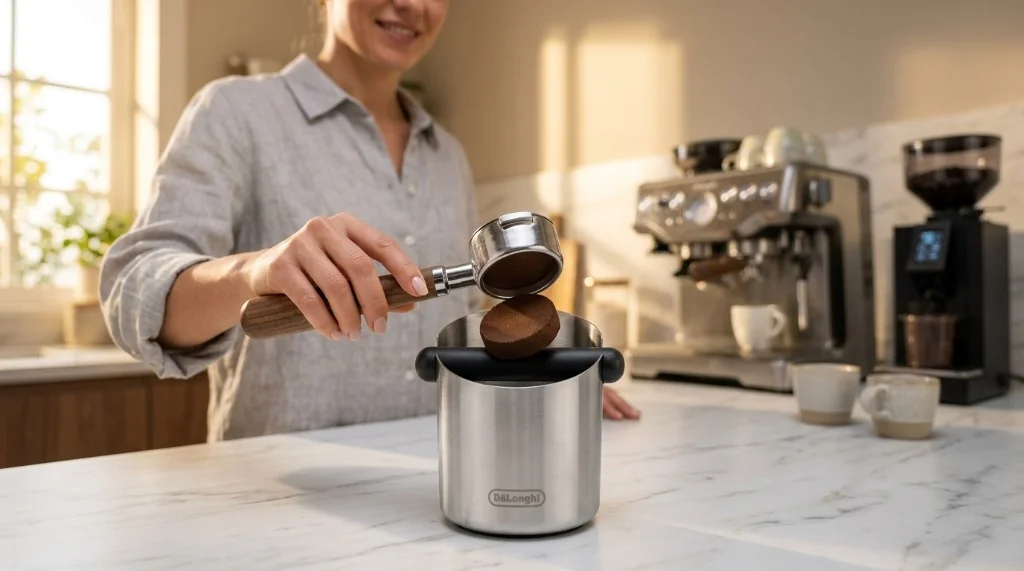
The De'Longhi DLSC084 knock box is the collection's pick for this step. Its core data: a brushed stainless steel body with a removable rubberised strike bar, a weighted non-slip base, and a 10-puck capacity that holds several rounds before emptying. The collection lists it at approx. €22.40–€22.99 across Germany, France and Italy, with the Breville Knock Box 10 at approx. $33.95 in the US and the Ideal Swan box at approx. €17.98 in Spain.
Before you buy: pick a box small enough that you will actually empty it every day or two. Grounds left for weeks in a large box are a mould risk, not a convenience.
See the full knock box breakdown in the collection →
What You Actually Need on Day One
Here is the first clear cut of the list. The point of this section is to stop you buying everything at once.
Essential
- Espresso machine — the centre of the station.
- Espresso-capable grinder — without a fine, adjustable grind, nothing downstream can be controlled.
- Coffee scale (0.1g) — the tool that makes dose and yield repeatable.
- Correctly sized tamper — if the tamper included with your machine fits and levels properly, you already own this.
Highly Useful
- Dosing funnel — stops the daily mess at its source.
- Knock box — turns cleanup into a gesture instead of a trip across the kitchen.
Optional
- WDT tool — optional at first, highly useful once puck consistency becomes a problem you are actively chasing.
- Milk pitcher — optional if you do not drink milk-based espresso; essential if you do.
What You Can Skip at First
This is the section most espresso accessory pages leave out, and it is the one that saves you the most money.
Don't Buy Every Puck-Prep Gadget
The following items are frequently presented as necessary. They are not, at least not on day one. Our verdict guide details why you should skip gadgets that solve problems you do not have yet, and why you should not buy every puck-prep gadget upfront:
- Puck screen — a real cleanup aid, but not a substitute for good puck preparation.
- Leveling tool — useful if level tamping is difficult for you, superfluous once you can do it.
- Bottomless portafilter — a diagnostic and enthusiast tool, not a beginner requirement.
- Premium tamping station — organisation and aesthetics, not extraction.
- Precision basket — a sensible upgrade, but one to make after your basics are stable.
Don't Upgrade the Tamper Just Because It Looks Better
If the included tamper fits your basket correctly and produces a level puck, there is no functional reason to replace it. A heavier tamper with a nicer handle is a comfort upgrade. Buy it when you want to, not because a list told you to.
How to Arrange Your Espresso Station
A setup becomes a station only when the layout follows the workflow. Place the tools in the order you actually touch them.
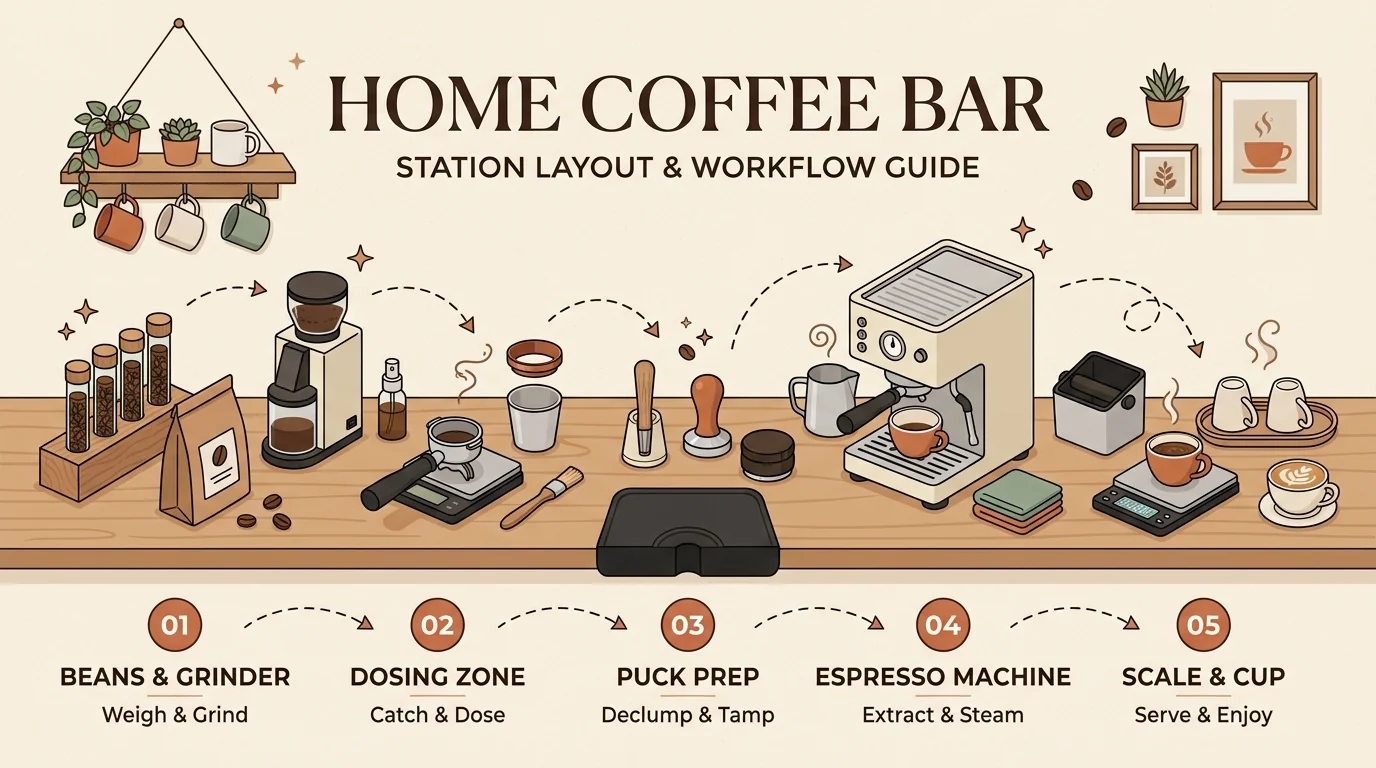
And around the machine:
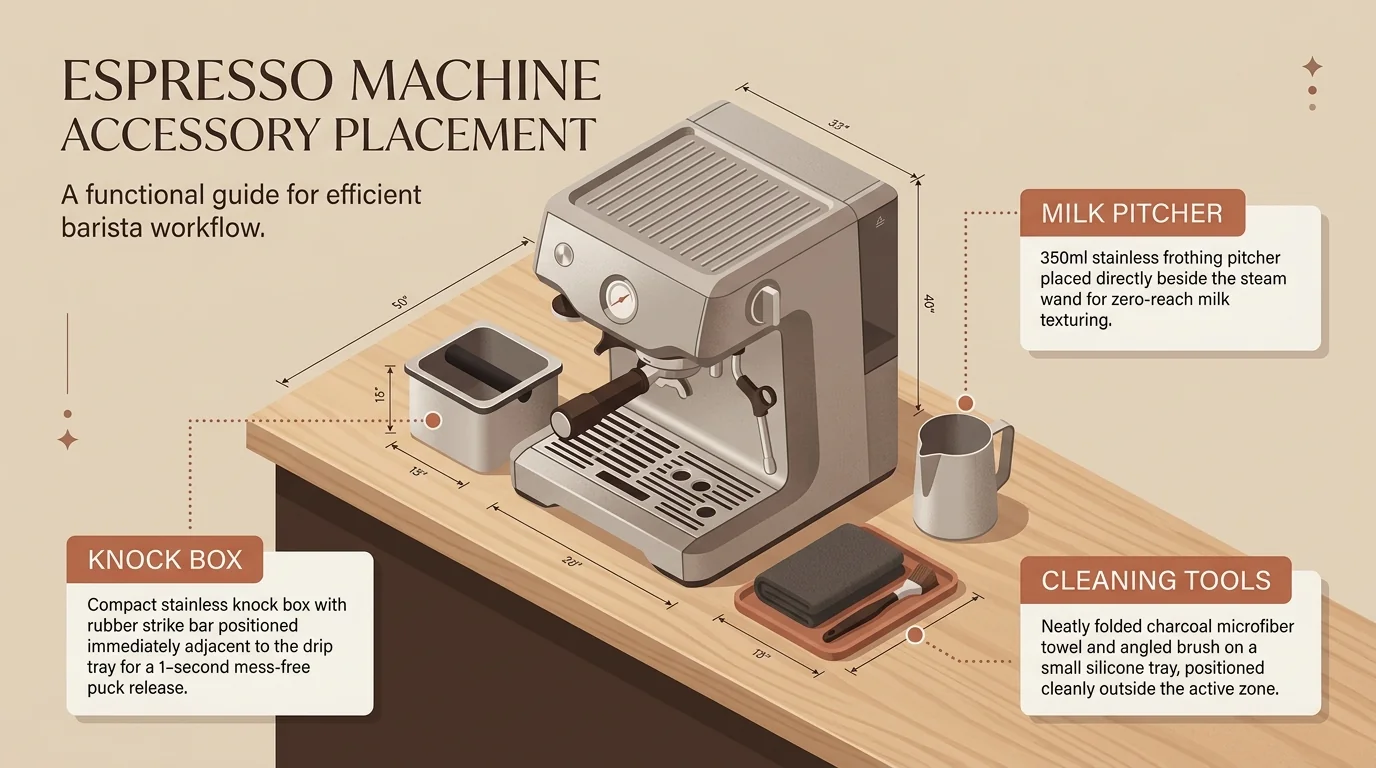
Keep the Grinder Close to the Machine
Every centimetre between grinder and machine is one more chance to spill grounds or knock a loaded portafilter. Keep the distance short and the workflow stays clean.
Leave Room for the Water Tank
Reservoir location varies between machines. Some fill from the rear, some from the front, and some lift out from the top. There is no universal clearance figure to quote. Check your machine's manual before you finalise the layout, or you will end up moving a full machine every morning.
Think About Counter Depth and Vertical Clearance
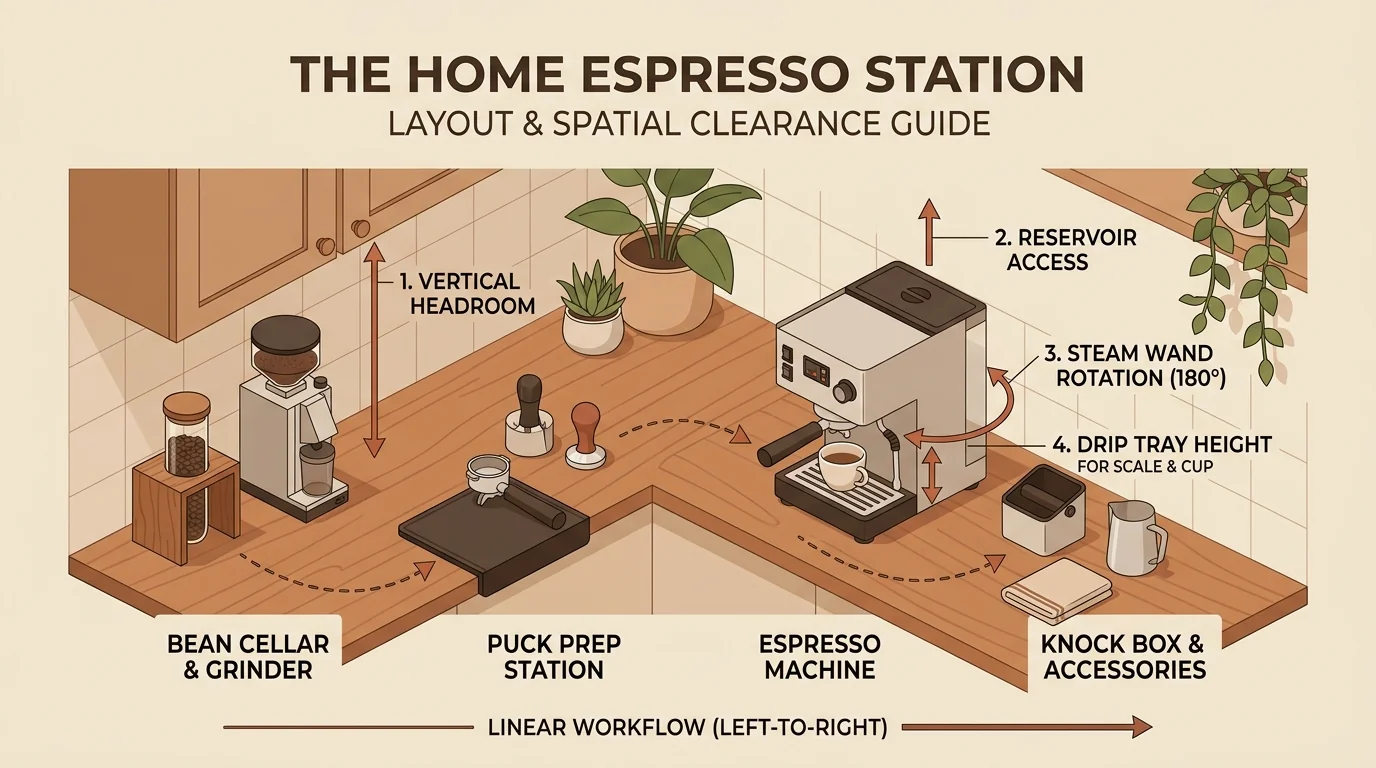
Before committing to a layout, check four clearances:
- Water reservoir access — can you refill without moving the machine?
- Bean hopper clearance — does the grinder fit under your upper cabinets?
- Steam wand swing — can you angle the pitcher freely?
- Cup and scale clearance — does your tallest cup plus the scale fit under the group head?
Build Your Setup in This Order
If you buy in stages instead of all at once, this is the order that gets you to a working workflow fastest. You can also cross-reference this with our five-stage buying priority ladder.
Step 1 — Machine + Grinder
Establish the basic brewing system. Without an espresso-capable grinder, no accessory can compensate.
Step 2 — Scale + Correct Tamper
Establish repeatability. This is the step that turns espresso from a lottery into something you can adjust.
Step 3 — Dosing Funnel
Solve the mess. Once you are grinding every day, this is the tool you miss most when it is absent.
Step 4 — Milk Pitcher
Only if you drink milk-based espresso. If not, skip it.
Step 5 — Knock Box
Optimise cleanup. A quality-of-life improvement, not an extraction requirement.
Step 6 — WDT Tool
Add it when you start actively chasing puck distribution and shot-to-shot consistency.
A Simple Espresso Setup for Different Types of Users
There is no single correct setup, because the right tools depend on what you drink and how you work.
Espresso / Americano Drinkers
Focus on: machine, grinder, scale and a correctly fitting tamper. That is a complete, functional setup. A funnel helps with mess and a knock box with cleanup, but neither changes what is in the cup.
Latte / Flat White Drinkers
Add a milk pitcher sized for your usual serving. Now the steam wand is part of your core workflow, and the pitcher is no longer optional.
Mess-Averse / Small-Kitchen Users
Prioritise the dosing funnel and the knock box. Both exist to contain mess, and both matter more when your preparation surface is small.
Hobbyists Who Want to Dial In
Add a WDT tool and consider a more responsive scale. This is where distribution and measurement precision pay off, but it is a later stage, not a starting point.
The Espresso Setup in One Simple Checklist
Start With
- Espresso machine
- Espresso-capable grinder
- Coffee scale (0.1g)
- Correctly sized tamper
Add When Useful
- Dosing funnel
- Milk pitcher (for milk drinks)
- Knock box
- WDT tool
Skip Initially
- Decorative or duplicate accessories
- Unnecessary premium upgrades
- Advanced puck-prep gadgets
Every tool in this workflow also carries a verdict in our comprehensive companion guide Coffee Gadgets That Are Actually Useful: What to Buy and What to Skip, or check out the one-line verdicts for every gadget to separate what changes the cup from what only changes the counter.
Frequently Asked Questions
What do I actually need for an espresso setup at home?
At minimum: an espresso machine, an espresso-capable grinder, a 0.1g coffee scale, and a tamper that fits your basket. That combination lets you grind, dose, tamp and measure repeatably. A dosing funnel and a knock box improve cleanliness and flow, but neither is required to make espresso itself.
Do I need a coffee scale for espresso?
Yes. A scale is what makes your results repeatable. It tells you both how much coffee went in and how much espresso came out, so when a shot tastes wrong you can identify whether the problem is grind, dose or yield instead of changing variables blindly.
Do I need a WDT tool?
Not necessarily on day one. WDT genuinely helps when you are using a non-pressurised basket with freshly ground coffee and working on distribution and consistency. If you are still getting comfortable with dose, grind setting and a level tamp, adding needle distribution just introduces one more variable.
Is a dosing funnel necessary?
It is not strictly necessary, but it is one of the highest-value convenience tools you can buy. It stops grounds from spilling over the basket rim during grinding and puck prep, which keeps both your counter and your routine cleaner.
Do I need an espresso tamper if my machine comes with one?
Only if the included tamper does not fit your basket correctly or does not produce a level puck. If it fits and levels properly, there is no functional reason to replace it, and a heavier tamper is a comfort upgrade rather than a necessity.
Do I need a knock box?
No, but it is genuinely useful if you pull several shots a day. It contains spent pucks beside the machine instead of sending you to the kitchen bin with a hot, wet portafilter. It improves cleanup, not extraction.
Do I need a milk pitcher?
Only if you steam milk. If you drink espresso or americano, you can skip it entirely. If you drink lattes, flat whites or cappuccinos, it becomes part of your core workflow, and 350ml is the size that works best for single servings.
What espresso accessories should I buy first?
Buy in workflow order: machine and grinder first, then a scale and a correctly sized tamper, then a dosing funnel, then a knock box, and finally a WDT tool if you want to chase puck consistency.
What espresso accessories can I skip?
Skip puck screens, leveling tools, bottomless portafilters, premium tamping stations and precision baskets until your basic workflow is stable. None of them solves a problem you have on day one, and buying them early just adds clutter and variables.
Where should I place my grinder?
Directly beside the machine. A short grinder-to-machine distance removes the need to carry a loaded portafilter across the counter and reduces the chance of spilling grounds on the way.
How much space do I need for an espresso station?
Rather than a fixed figure, check four clearances: water reservoir access, bean hopper clearance under upper cabinets, freedom for the steam wand to swing, and height under the group head for your tallest cup plus a scale. A compact setup can work in a very small footprint if the layout follows the workflow.
Should I upgrade my grinder or buy more espresso accessories?
Upgrade the grinder. Grind quality shapes what ends up in your cup more than any accessory, and an espresso-capable grinder is the foundation the rest of the workflow depends on. Accessories solve workflow problems; they do not correct extraction.
Do I need a bottomless portafilter as a beginner?
No. A bottomless portafilter is a diagnostic and enthusiast tool that makes channeling visible. It is useful when you are actively diagnosing shots, but it is not a requirement for making good espresso and is best treated as a later upgrade.
Where to Go Next
Once your espresso routine is dialed in, explore our companion guides to design your full counter layout and choose tested equipment:
- Designing your counter and storage space? Read our practical blueprint on How to Build a Home Coffee Bar: Space-Saving Setups, Smart Layouts, and What You Actually Need to organize zones and declutter surfaces.
- Looking for machines and essential accessories? Browse our curated roundup of Home Coffee Bar Setup: 13 Essential Tools & Machines for Cafe-Quality Coffee with side-by-side specs and regional models.
- Evaluating trendy espresso gadgets? Consult our no-nonsense verdicts in Coffee Gadgets That Are Actually Useful: What to Buy and What to Skip to see which tools genuinely help and which to skip.